
Technically the real name for this type of crochet is 'lace' or 'trellis work'. In it's most basic format, it's the creation of a crochet chain and then linking it together at various counted and patterned intervals to make a trellis-type 'structure'.
Although rather clumsy, and now very well worn, this little scarf was a good first project as I was able to invent it as I went along - counting in multiples of four and eight to make squares that were joined with a slip stitch.
Looking back, I can now see that for someone first learning to crochet, the best and most obvious practice initially is to keep making a long chain, undoing it, and then starting again. However, most people, embarking on crochet for the first time (or returning after a long while, like me), want to make something interesting straight off, rather than a practice square, or a dishcloth.
So, as the title says, you 'think' you can't crochet, and........
- you've only ever got as far as making a chain in crochet and no further?
- you want to make something interesting and attractive for your first ever project?....and
- you want to make something that others will look at and say 'oooh, you must have been crocheting for years, it looks so intricate!'?

I find that the best type of yarn to start trying something like this with is a nice ball of good old acrylic double knitting (DK) - there is something substantial to get hold of, you can easily see your stitches, it is no problem to wash afterwards and it won't easily become misshapen when you work with it. Also, if things don't go according plan whilst you're 'learning', then there hasn't been any great expense involved in your initial venture. Deramore's have some excellent choices in DK, Robin being a very well known and trusted brand - you can see what is available HERE.
A reasonable sized crochet hook for working with this type pattern and yarn is a 3.25mm (USA = D). Over time we all get used to our own particular brands, styles and favourites (I certainly have mine!) but you will find a good selection, also with Deramore's, HERE.

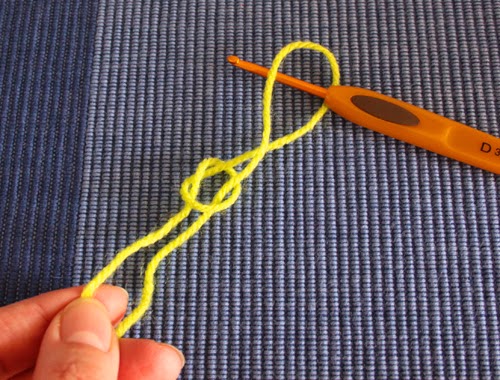
So, as a little refresher, you will first need to make a slipknot to start, and here is a simple way to do it.
1. Form a loop with your yarn

2. Use your crochet hook to locate the back strand and start to pull it through


3. Keeping a firm hold on both strands of the yarn, continue to pull the loop through until it looks like this
4. Close the loop on the hook (but not too tightly) by pulling the tail end of the yarn.

And there you have it - a slipknot.
Ok, so now a reminder on creating the basic chain stitch.
1. Wrap the yarn around/over the hook


2. Pull the yarn down to the loop, and then through


3. Repeat this, wrapping the yarn around the hook....


4. .....then pulling the yarn down to the loop, and through........


.......then just keep repeating the process to make the chain - it's as simple as that, and really easy to get back into! Notice how the chain has already started to appear, even after only a couple of stitches.
Until you feel really at ease doing this, it is advisable to do the 'making a chain and then undoing it' thing, repeatedly, until you get into a rhythm with it and are creating a nice, even, flat effect. Chain-chain-chain as much as you like! (although about 2 ft each time is more than enough).

When you have mastered the technique for a nice even crochet chain, this is where the interesting bit starts!
Depending on how long you want to make your scarf, you will need to make your starting (or base) chain accordingly. For mine I made a chain of 400. It sounds like a lot, but it's about right for a scarf and it doesn't take long at all (especially after all that chain-chain-chain practice you've had!). This will give you a scarf that is approx 160cm long with plenty to wrap around.
Whatever length you decide to make, it does need to be in multiples of (or divisible by) five for this size of pattern.
After making your chain, keep a note of the last stitch and then makes another 9 chains (1). Count back 5 stitches from the stitch that you noted and make a slip stitch here, as follows. Put the hook through the fifth stitch along (2), wrap the yarn around the hook (3) and then pull it through both the fifth stitch (4) and one you already had on the hook (5).
1 2


3 4

5

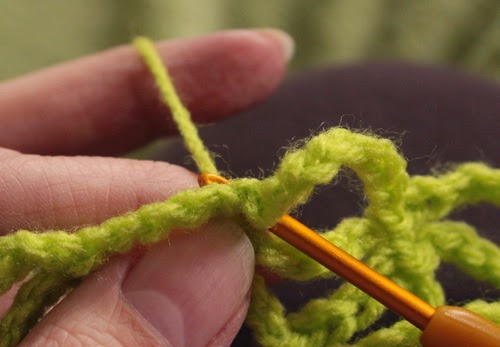
Then continue by chaining another 9, counting along 5 stitches and making another slip stitch here. Your work should start to look like this, with a row of little loops or triangles.

Continue in this way to the end, chaining 9, counting five stitches and making a slip stitch to attach it.


 This is still a WIP. I have started adding some crochet chain embellishments to the basic structure, using different colours to pick out the hexagon shapes that have formed from the triangles. It will be interesting to see where this goes and I shall add an update when I have finished.


And this is how the scarf looks when it is worn
You should have made 80 triangles if your multiples of 5 have worked correctly.
On getting to the end, turn your work (so that you can crochet back in the other direction) and chain another 9 to make an additional 'continuation' triangle, this time connecting it to the 5th (or middle stitch) of your first triangle. Then chain 5 and and slip stitch into the fifth (middle) stitch of each triangle until you get to the end of the row.
Continue to add rows in this way, alternating a row of triangles with a row that makes a straight line in groups of 5. The ends of your rows will leave you with a pointy zigzag edge across the finished ends. Add as many pairs of rows as you require - I found that 7 was about right for me.
This is still a WIP. I have started adding some crochet chain embellishments to the basic structure, using different colours to pick out the hexagon shapes that have formed from the triangles. It will be interesting to see where this goes and I shall add an update when I have finished.And this is how the scarf looks when it is worn
So.....you 'thought' you couldn't crochet??
www.deramores.com/blog-awards This blog entry is my submission to the Deramores Blog Awards 2014. Deramores is the UK’s number one online retailer of knitting and crochet supplies.
No comments:
Post a Comment
Thank you for taking the time to comment. It is great to get feedback!